

旨在通过COS客户端实现图片随机访问。
废话不多说,咱们开始吧,搭建一个属于自己的随机图片图床。

一、环境和工具介绍
操作系统:Ubuntu 24.04 LTS
运维面板:1Panel 社区版 v1.10.23-lts
代理服务器 OpenResty:1.21.4.3-3-3-focal
PHP版本:8.3.8
Python版本:3.10
Composer版本:v2.8.5
小伙伴们可以自行选择对应的环境和工具,以上仅供参考。
二、前期准备
2.1 COS的部署
因为相关的教程,网上已经有很多了,所以这里我不在赘述了。
推荐一个相关教程:https://www.cnblogs.com/txycsig/p/18512703
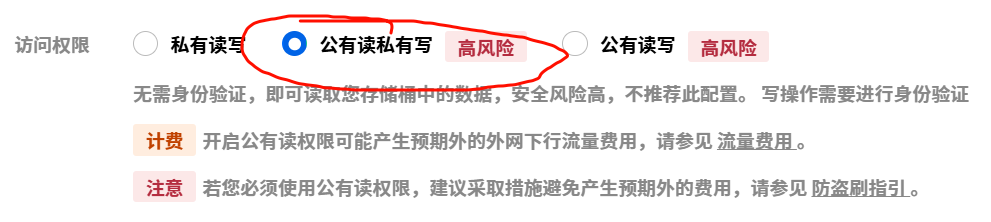
注意这里创建存储桶时,因为图片要外部访问,所以要勾选公共读私有写。
后续可以根据自己的业务需求选择相应的配置。
2.2 PHP网站的搭建
首先创建一个运行环境
登录1panel运维面板,点击网络 -> 运行环境 -> 创建运行环境 ,
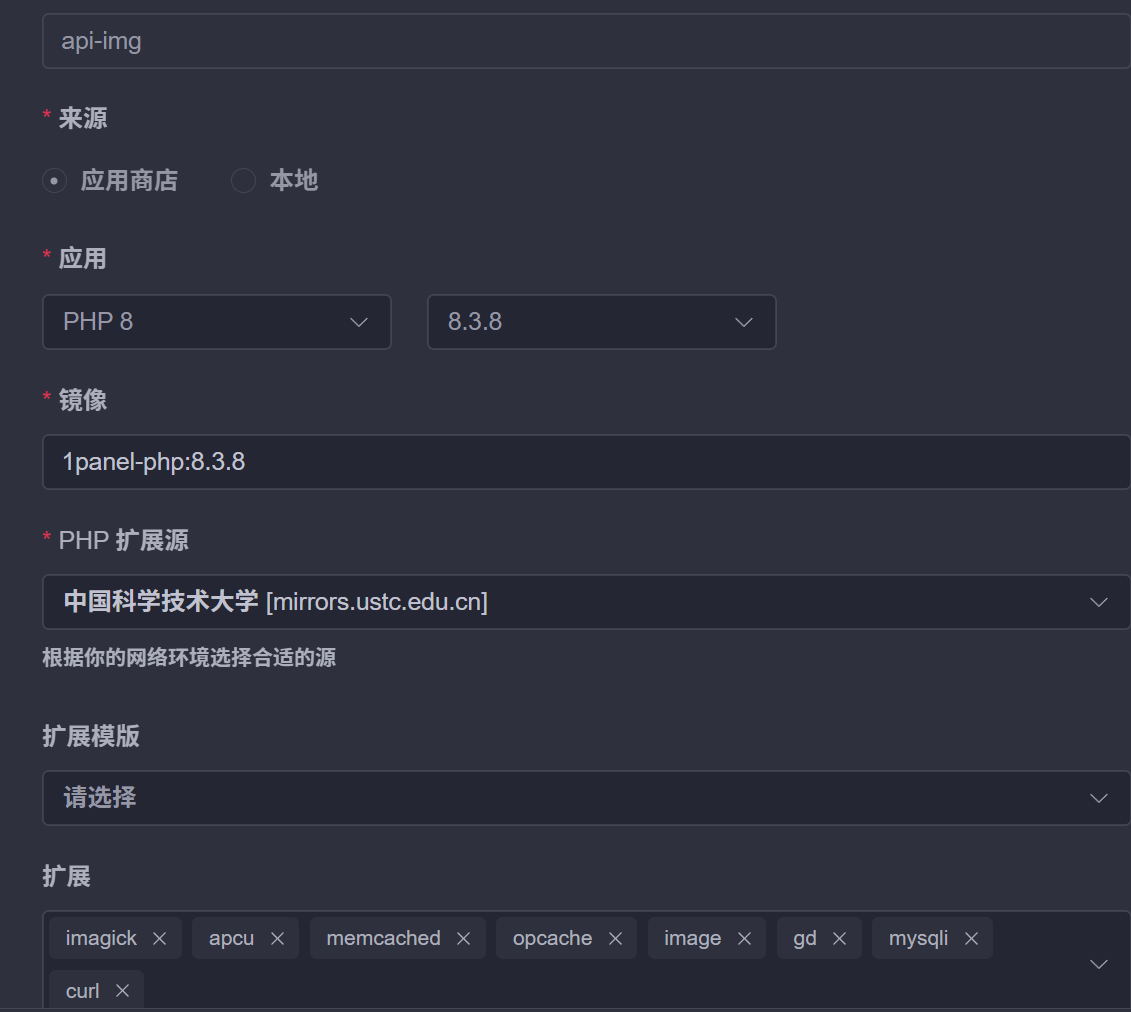
扩展按照自己的选择进行添加。
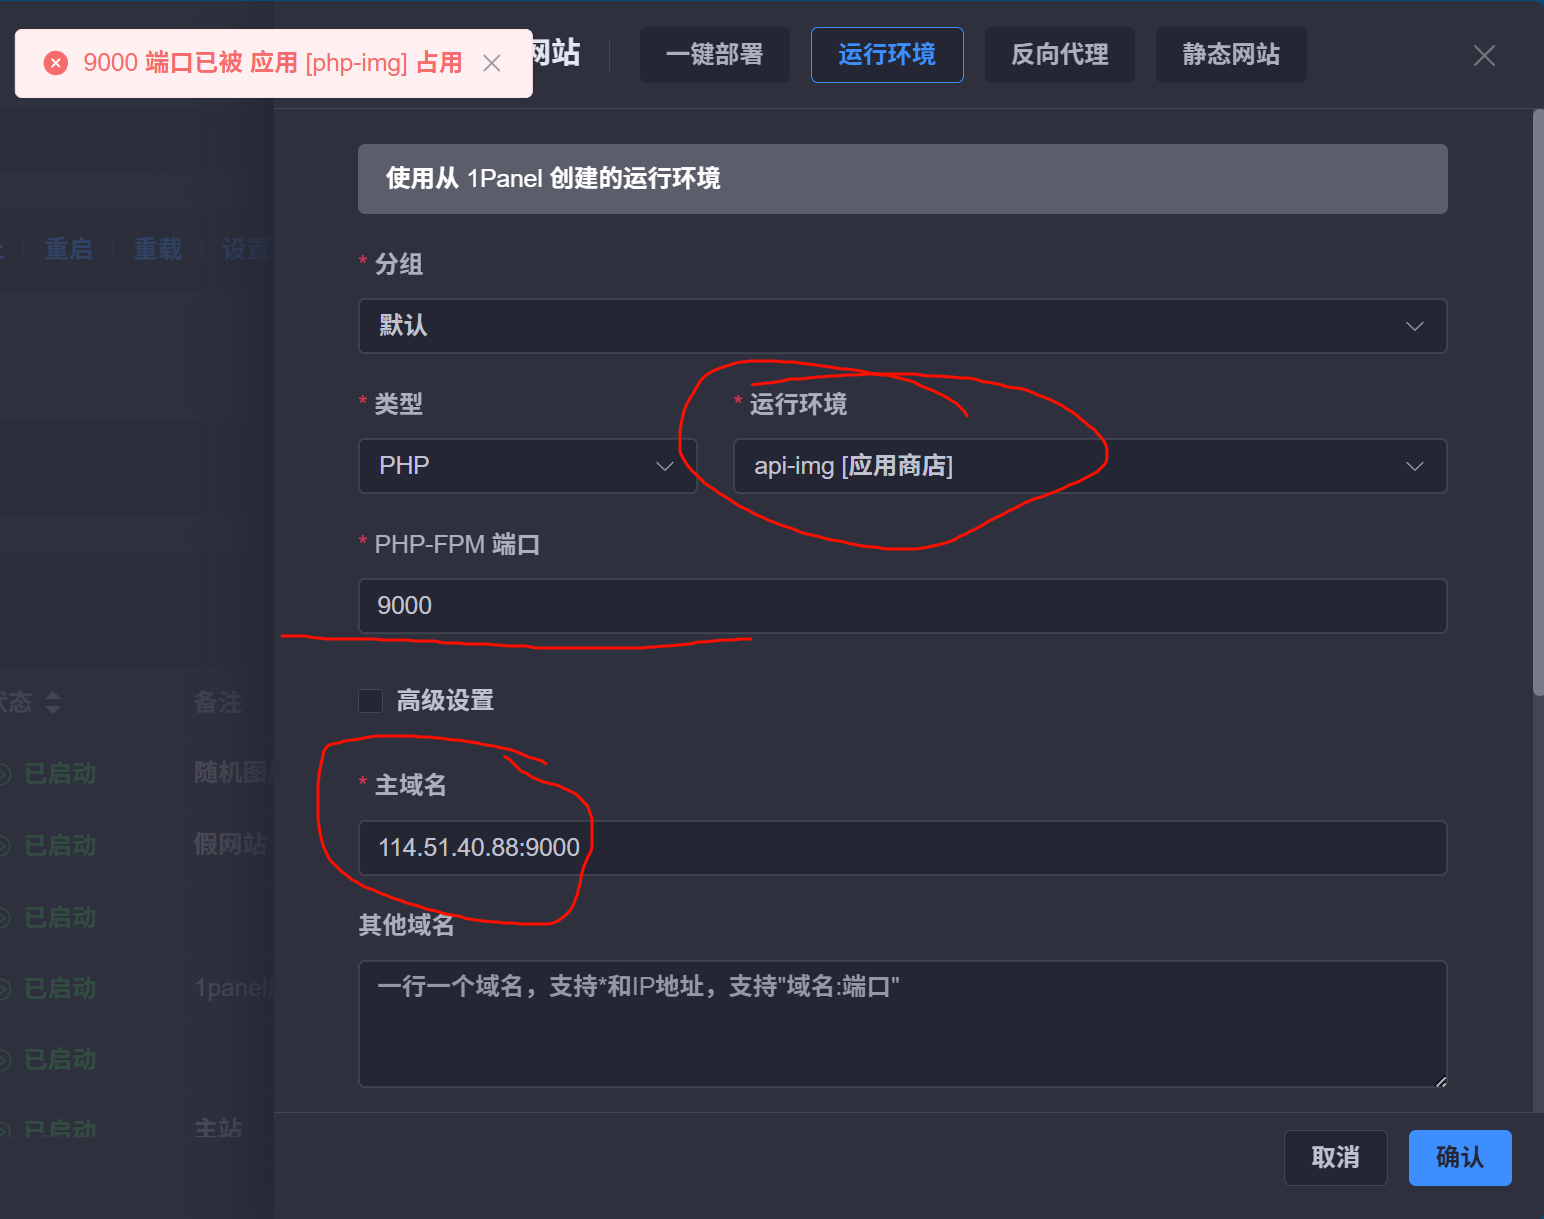
接下来就是创建网站:
运行环境的主域名设置成你的IP:端口
这里和PHP8端口冲突了,换一个就行,比如改成9001,后面的反向代理就是通过这个端口来获取资源。
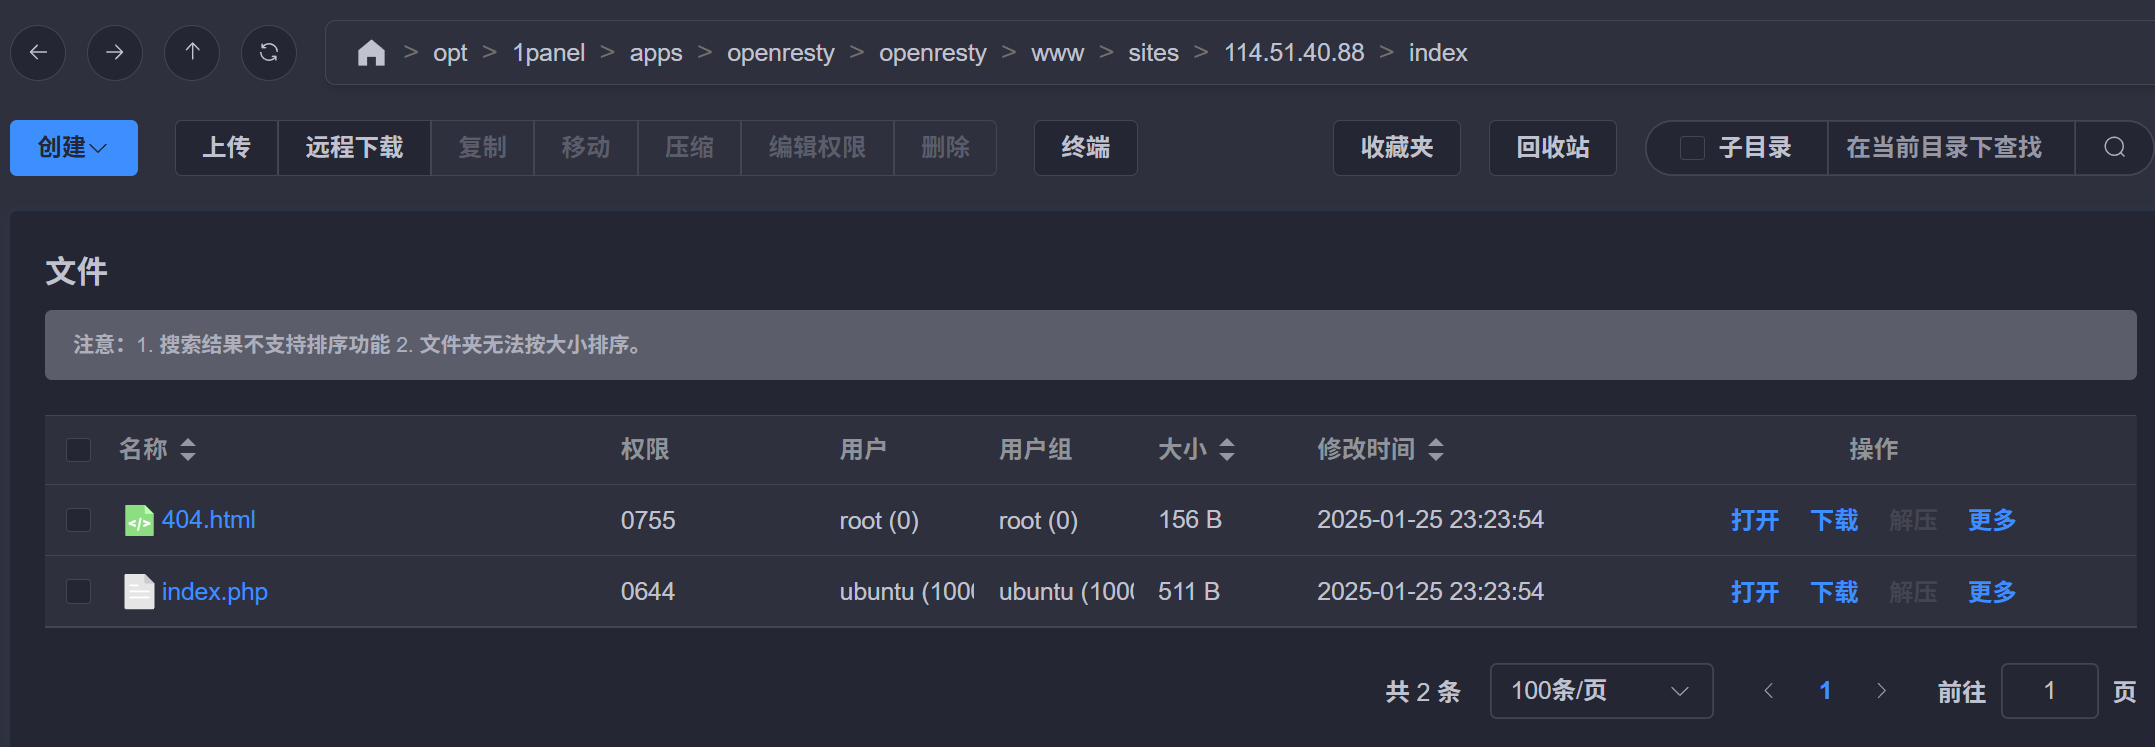
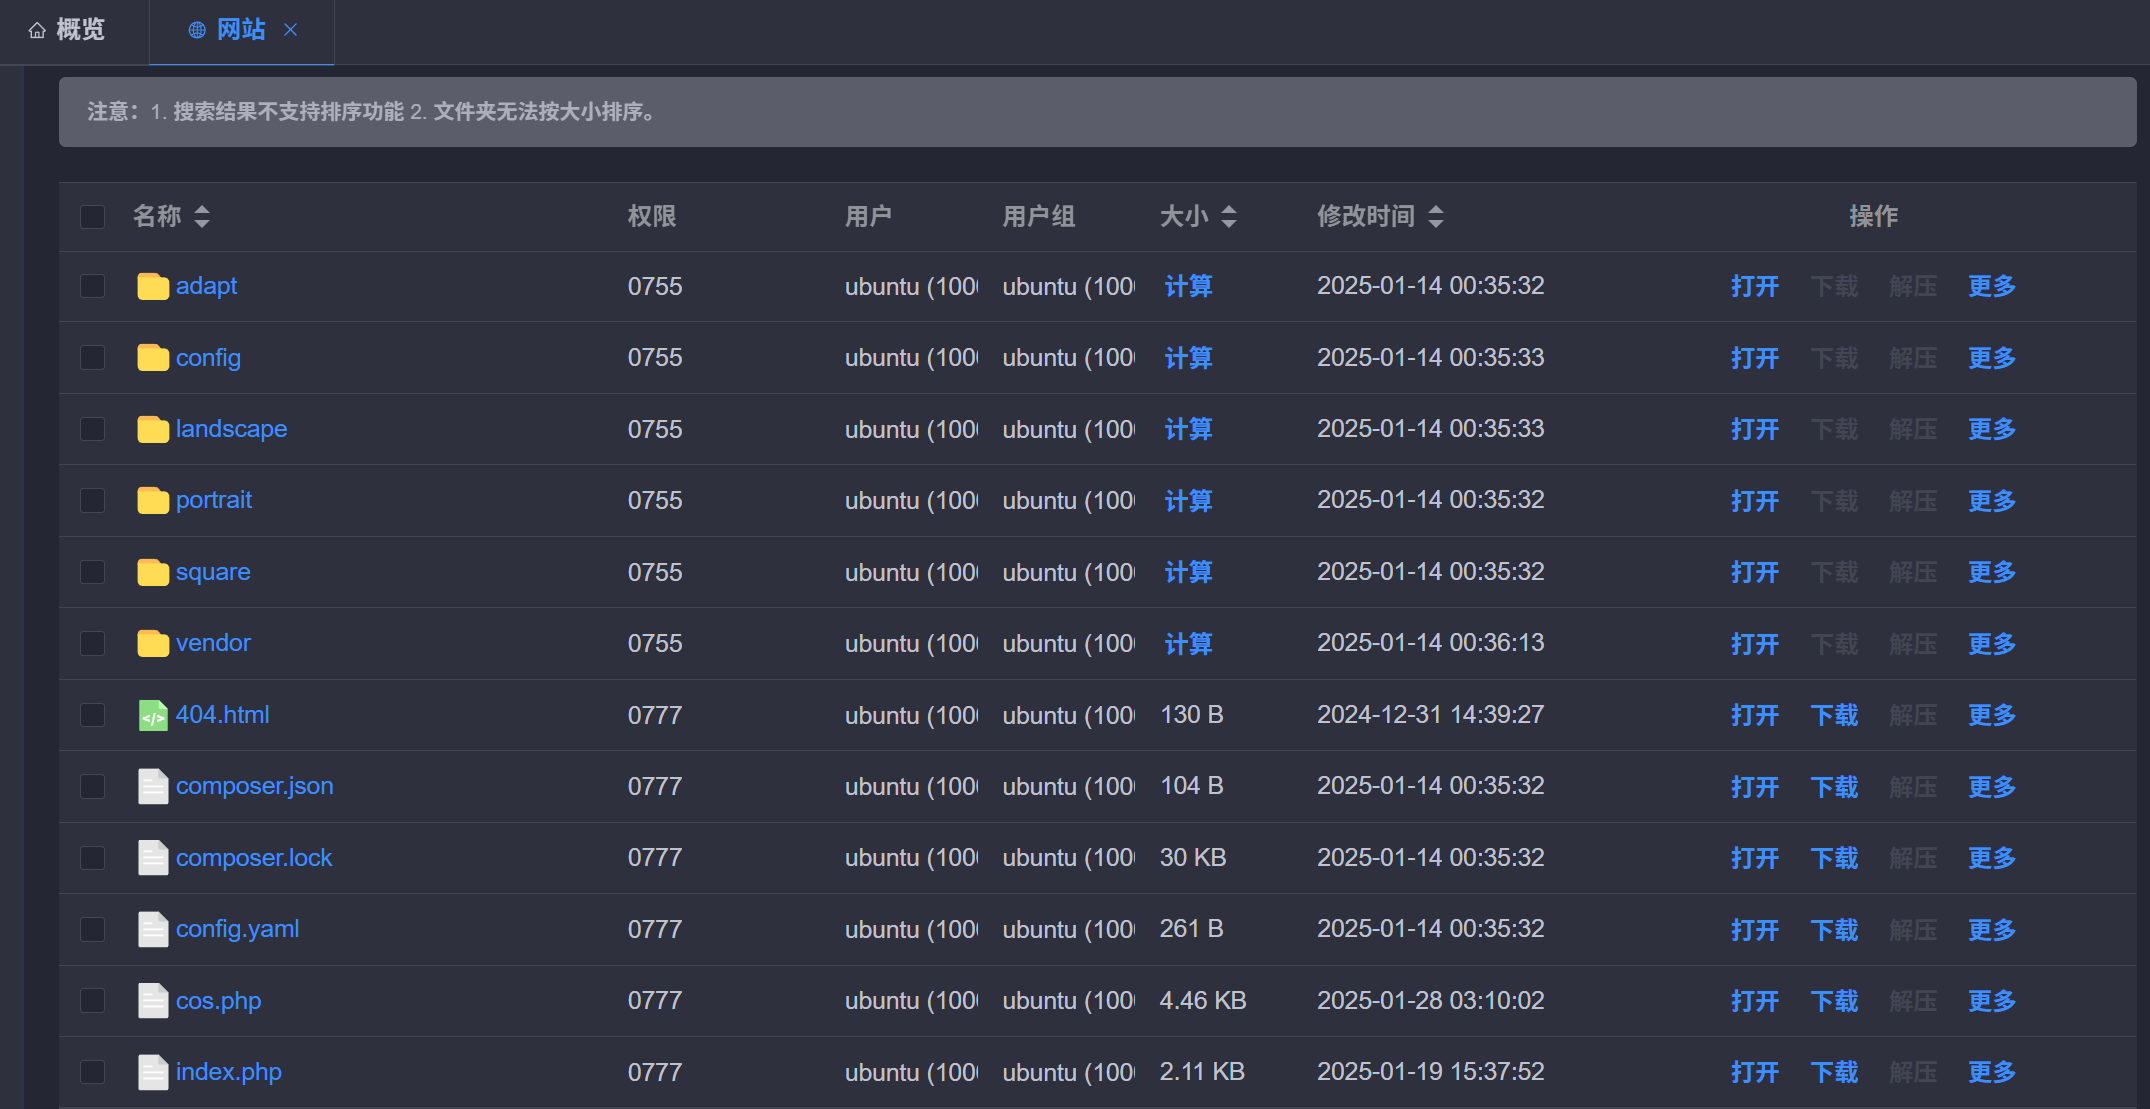
然后进入该网站目录的index文件夹,之后就可以上传你的php项目了:
接下来可以选择的做反向代理:
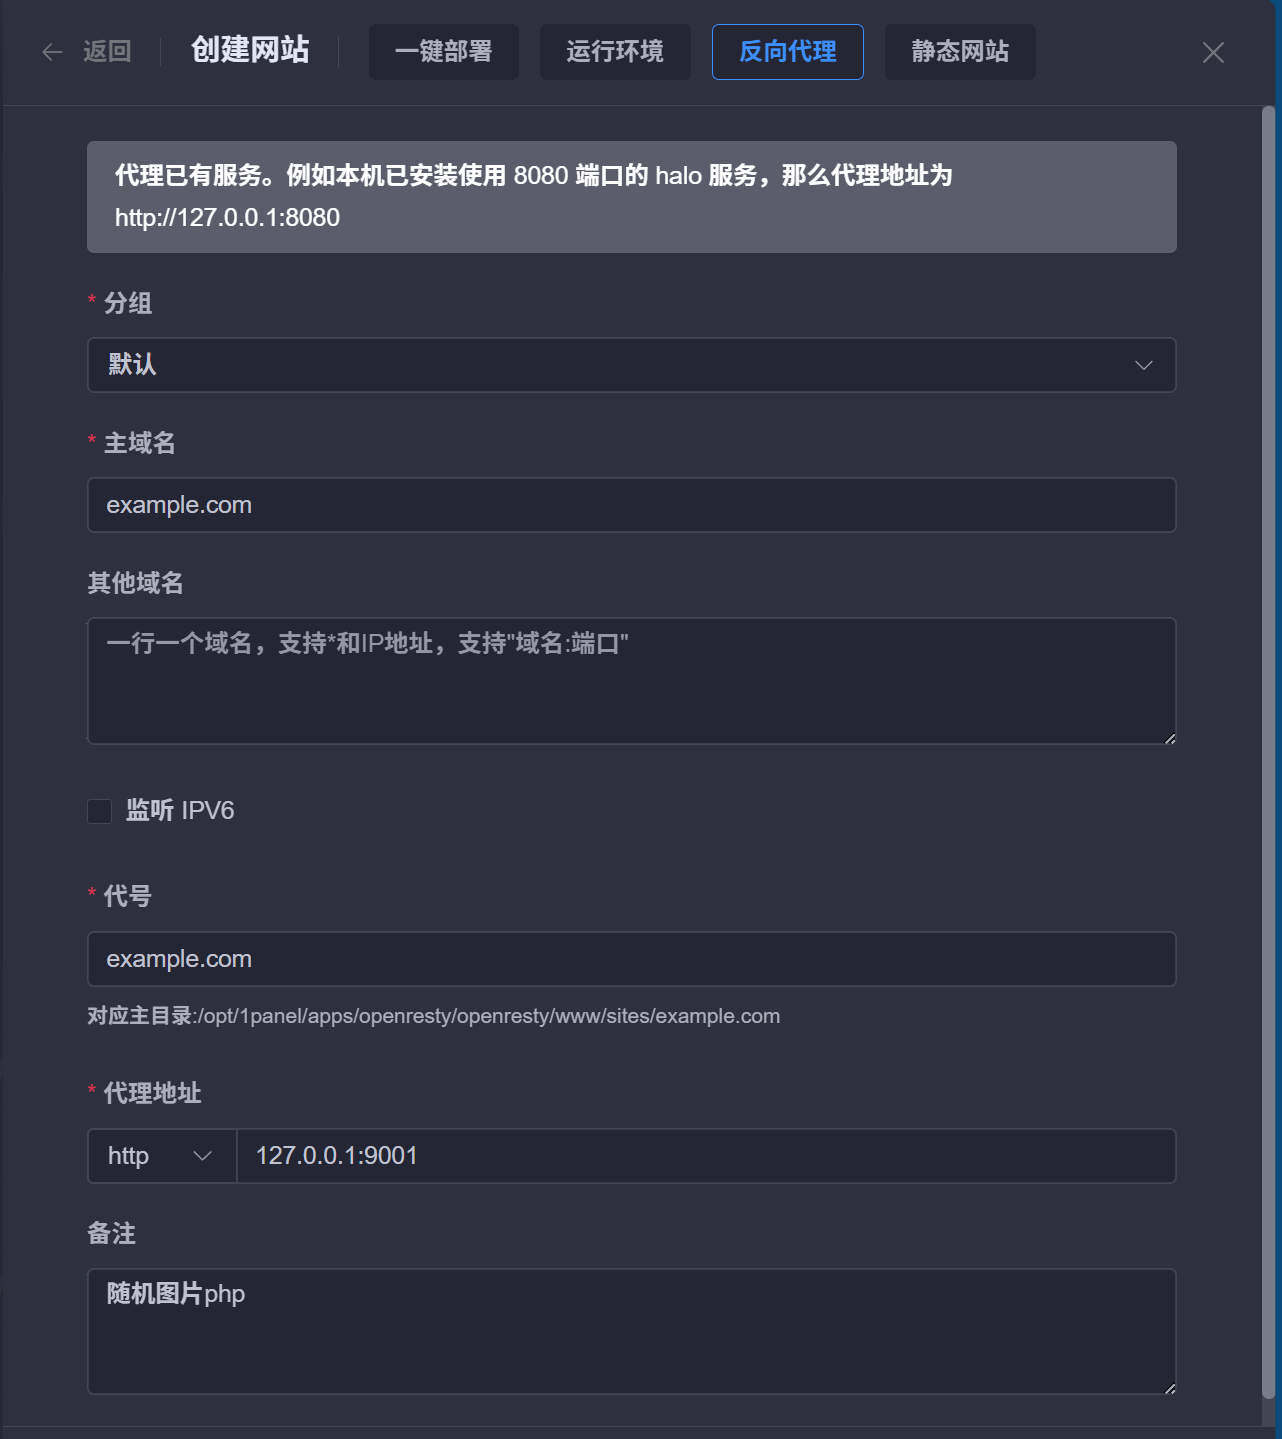
代理地址的端口号改成你自己所配置的PHP-FPM的端口。
至此PHP网站搭建完成。
三、代码的编写
3.1 图片分类和处理
这里我想做个api分类,要用到两类图,横屏、竖屏,分别对应文件夹landscape,portrait
可以写个py脚本来实现分类:
需要用到的库:
import io
import os
from PIL import Image
import time
from tqdm import tqdm
from concurrent.futures import ThreadPoolExecutor
可能要处理的图片比较多,所以我这里用到了线程池处理:
def classify_images(source_folder):
    """
    将图片分类到指定目录
    :param source_folder: 待处理图片的文件夹路径
    """
    image_files = [os.path.join(source_folder, f) for f in os.listdir(source_folder) if
                   f.lower().endswith(('.png', '.jpg', '.jpeg'))]

    with tqdm(total=len(image_files), desc="Sorting images") as pbar:
        with ThreadPoolExecutor(max_workers=4) as executor:
            futures = [executor.submit(process_image, file_path) for file_path in image_files]
            for future in futures:
                future.result()  # 等待线程完成
                pbar.update(1)
图片我是根据时间戳重命名处理,方便以后的管理:
def process_image(file_path):
    """处理单张图片"""
    try:
        with Image.open(file_path) as img:
            # 获取图片尺寸
            width, height = img.size

            # 根据尺寸分类
            if width > height:
                destination = 'landscape'  # 横屏
            else:
                destination = 'portrait'  # 竖屏

            # 如果图片过大则调整大小,取消注释使用
            # img = resize_image(img)

            # 生成时间戳和新文件名
            timestamp = int(time.time() * 1000)
            base_name = os.path.splitext(file_path)[0][-6:]
            ext = img.format.lower().replace('jpeg', 'jpg').replace('png', 'png')
            new_filename = f"{base_name}{timestamp}.{ext}"
            new_file_path = os.path.join(destination, new_filename)

            # 保存图片
            img.save(new_file_path)
如果你觉得原始图片大小过大,可以自己添加限制,这里我限制在5M以内:
def resize_image(img, max_size=5 * 1024 * 1024):
    """调整图片大小以满足最大文件大小限制"""
    if img.size[0] * img.size[1] < max_size:
        return img
    quality = 95
    img_byte_arr = io.BytesIO()

    try:
        if img.format == 'PNG':
            img = img.convert('RGB')
            img.save(img_byte_arr, format='JPEG', optimize=True)
            img = Image.open(img_byte_arr)
        else:
            img.save(img_byte_arr, format=img.format, optimize=True)

        if img.format == 'JPEG':
            while img_byte_arr.getbuffer().nbytes > max_size and quality > 10:
                img_byte_arr = io.BytesIO()  # 重置字节流
                img.save(img_byte_arr, format='JPEG', quality=quality, optimize=True)
                quality -= 5

        img_byte_arr.seek(0)
        return Image.open(img_byte_arr)
    except Exception as e:
        print(f"Error resizing image: {e}")
        return img
3.2 图片上传
首先需要下载qcloud_cos依赖:
pip install qcloud_cos 需要用到的库:
import os
from qcloud_cos import CosConfig
from qcloud_cos import CosS3Client
from qcloud_cos.cos_exception import CosClientError, CosServiceError
一些参数:
SECRET_ID = ''
SECRET_KEY = ''
REGION = '' # 例如ap-shanghai
BUCKET = '' # 桶名字
FOLDER_PATH = ['landscape', 'portrait'] # 文件夹名字,想要更多的分类可以继续往里添加
ALLOWED_EXTENSIONS = {'.jpg', '.jpeg', '.png'}

# 初始化配置和客户端
config = CosConfig(
    Region=REGION,
    SecretId=SECRET_ID,
    SecretKey=SECRET_KEY
)
client = CosS3Client(config)
上传的方法:
def upload_images_to_cos():
    try:
        for folder in FOLDER_PATH:
            for root, dirs, files in os.walk(folder):
                for filename in files:
                    ext = os.path.splitext(filename)[1].lower()
                    if ext not in ALLOWED_EXTENSIONS:
                        continue

                    local_path = os.path.join(root, filename)
                    object_key = os.path.relpath(local_path, start='.')  # 获取相对当前目录的路径
                    object_key = object_key.replace('\\', '/')

                    # 上传文件
                    client.upload_file(
                        Bucket=BUCKET,
                        LocalFilePath=local_path,
                        Key=object_key,
                        PartSize=10,
                        MAXThread=10,
                        EnableMD5=False
                    )
                    print(f'上传成功: {local_path}')

    except CosClientError as client_error:
        print(f'客户端错误: {client_error}')
    except CosServiceError as service_error:
        print(f'服务端错误: [{service_error.get_status_code()}] {service_error.get_error_message()}')
    except Exception as e:
        print(f'其他错误: {str(e)}')
3.3 php的依赖引入
腾讯云PHP SDK入口:https://cloud.tencent.com/document/product/382/43195
建议中国大陆地区的用户先设置腾讯云镜像源:
composer config -g repos.packagist composer https://mirrors.tencent.com/composer/在项目的目录下通过Composer下载SDK依赖,下载成功之后会在项目根目录下自动生成 vendor目录、composer.json和composer.lock文件:
composer require qcloud/cos-sdk-v5 通过Composer下载yaml依赖(可选),我是用来存放个人秘钥信息的:
composer require symfony/yaml 创建一个CosConfig.yaml,填入你的个人秘钥信息:
secretId: '' # 替换为你的 SecretId
secretKey: '' # 替换为你的 SecretKey
region: '' # 替换为你桶所在的地域。例:ap-shanghai
bucket: '' # 替换为你的桶名
domainCDN: '' # 替换为你的CDN加速域名(可选),例:https://example.com
3.4 API编写
这里我编写了一个图片加载器(cos.php),通过连接腾讯云COS客户端,实现不同类型图片的访问。
<?php
require_once 'vendor/autoload.php';

use Symfony\Component\Yaml\Yaml;
use Qcloud\Cos\Client;

class ImageLoader
{
	private Client $cosClient;
	private array $config;
	private string $prefix;

	public function __construct(string $yamlUrl, string $dirUrl)
	{
		$this->config = Yaml::parseFile($yamlUrl);
		$this->cosClient = $this->createCosClient();
		$this->prefix = $dirUrl;
	}

	/**
	 * @return Client
	 * 连接cos客户端
	 */
	private function createCosClient(): Client
	{
		return new Client([
			'region' => $this->config['region'],
			'credentials' => [
				'secretId' => $this->config['secretId'],
				'secretKey' => $this->config['secretKey'],
			],
			'scheme' => 'https',
		]);
	}

	/**
	 * @return array|null
	 * 获取cos图片列表
	 */
	public function getImgList(): ?array
	{
		return $this->executeCosRequest(function () {
			$imgs = [];
			$nextMarker = null;
			do {
				$params = [
					'Bucket' => $this->config['bucket'],
					'Prefix' => $this->prefix,
					'MaxKeys' => 1000,
				];
				if ($nextMarker) {
					$params['Marker'] = $nextMarker;
				}
				$result = $this->cosClient->listObjects($params);
				if (isset($result['Contents'])) {
					$files = array_slice($result['Contents'], 1);
					foreach ($files as $file) {
						$imgs[] = $this->config['domainCDN'] . "/" . $file['Key'];
					}
					// 这里如果不使用cdn的话,可以直接返回file的key:$file['Key']
				}
				$nextMarker = $result['NextMarker'] ?? null;
			} while ($nextMarker);
			return $imgs ?: null;
		});
	}

	/**
	 * @param string $imgKey
	 * @return array|null
	 * 获取图片内容
	 */
	public function getImageContent(string $imgKey): ?array
	{
		return $this->executeCosRequest(function () use ($imgKey) {
			return [
				'body' => null,
				'contentType' => null,
				'cdnUrl' => $imgKey,
			];
//			// 不使用CDN
//			$result = $this->cosClient->getObject([
//				'Bucket' => $this->config['bucket'],
//				'Key' => $imgKey,
//			]);
//			return [
//				'body' => $result['Body']->getContents(),
//				'contentType' => $result['ContentType'],
//			];
		});
	}

	/**
	 * @return array|null
	 * 获取随机图片
	 */
	public function getRandomImage(): ?array
	{
		$imgList = $this->getImgList();
		if (empty($imgList)) return null;
		$randomIndex = array_rand($imgList);
		return $this->getImageContent($imgList[$randomIndex]);
	}

	/**
	 * @return void
	 * 输出随机图片
	 */
	public function outputRandomImage(): void
	{
		$imageData = $this->getRandomImage();
		if ($imageData !== null) {
			header('Location: ' . $imageData['cdnUrl'], true, 301);
			exit;
//				// 不使用cdn直接返回图片内容就行
//				header('Content-Type: ' . $imageData['contentType']);
//				echo $imageData['body'];
		} else {
			echo "没有找到图片。";
		}
	}

	/**
	 * @param callable $request
	 * @return null
	 * 执行cos请求,统一异常处理
	 */
	private function executeCosRequest(callable $request): null
	{
		try {
			return $request();
		} catch (Exception $e) {
			echo "操作失败: " . $e->getMessage();
			return null;
		}
	}
}
以下为自适应的调用例子,根据设备的不同类型($deviceUrl)选择相应的图片类型:
<?php
require_once '../cos.php';

$yamlUrl = "../config/CosConfig.yaml";

// 获取设备类型
$deviceUrl = preg_match('/(android|iphone|ipad|mobile)/i',
    $_SERVER['HTTP_USER_AGENT']) ? 'portrait/' : 'landscape/';

$imageLoader = new ImageLoader($yamlUrl, $deviceUrl);
$imageLoader->outputRandomImage();
在设置的php默认文件中,例如index.php进行调用。
四、项目上传至服务器
代码写完之后就可以将项目部署到服务器上了。
将项目上传到之前创建的运行环境网站的index目录下:
当前主要的结构目录如下:
index.php
adapt(文件夹)
index.php
landscape(文件夹)
index.php
portrait(文件夹)
index.php
设置example.com的反向代理:
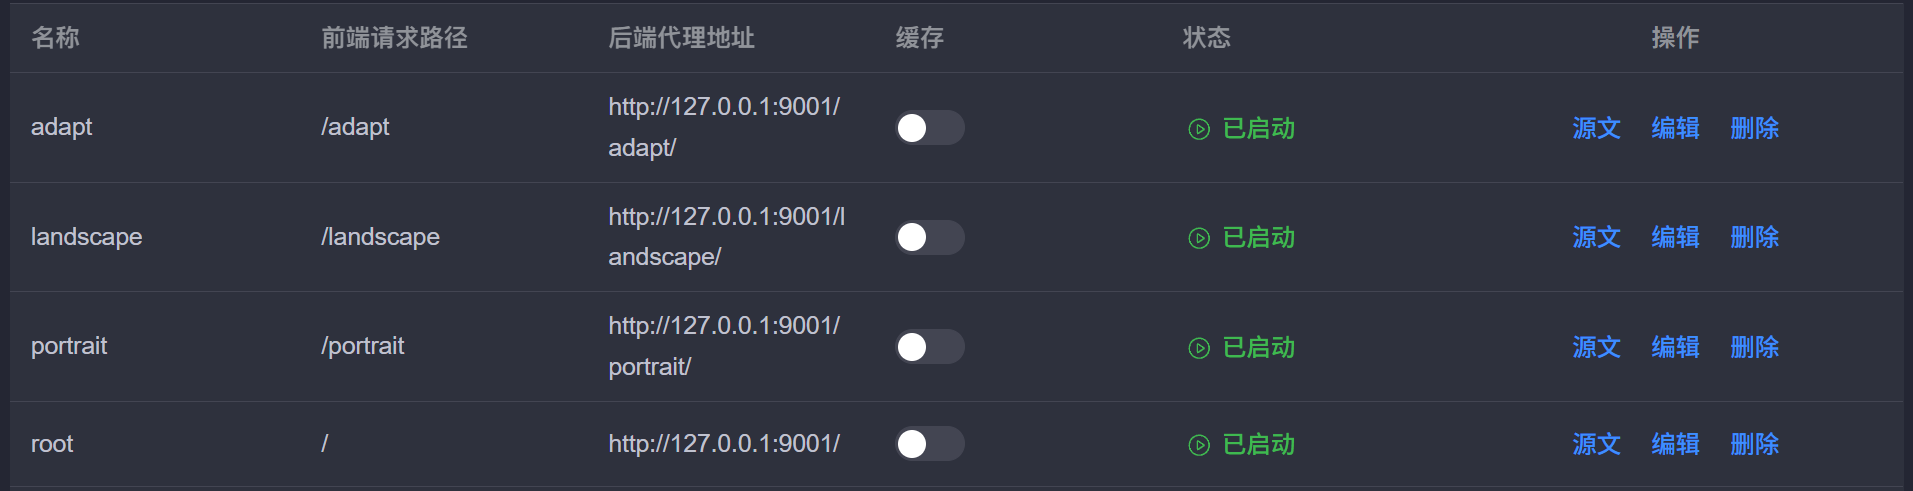
例如访问example.com/adapt就是自适应的api,example.com/landscape就是横屏的api。
至此就大功告成了。